Media Cabinet Cooling Fans

You are currently viewing Media Cabinet Cooling Fans
  • Reading time:12 mins read
  • Post last modified:16/05/2022
  • Post comments:0 Comments
  • Post category:Projects
  • Post author:

Overview

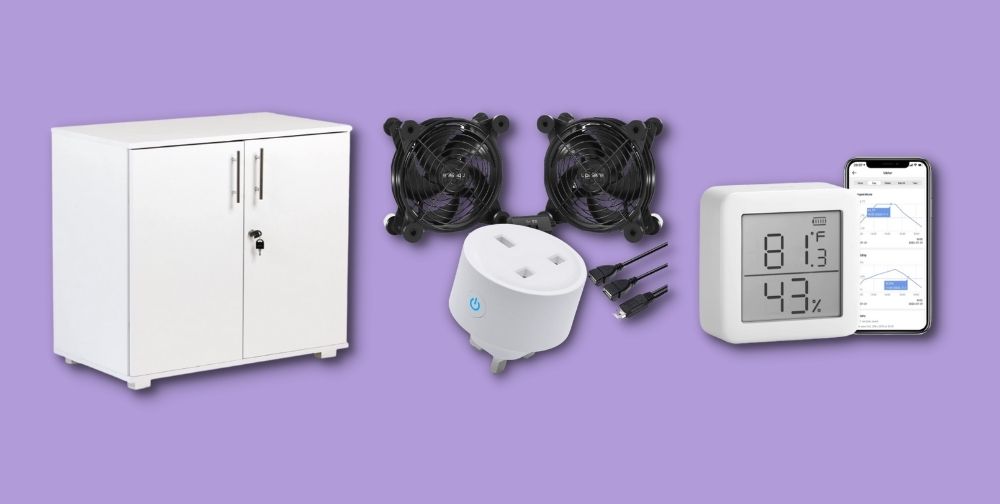
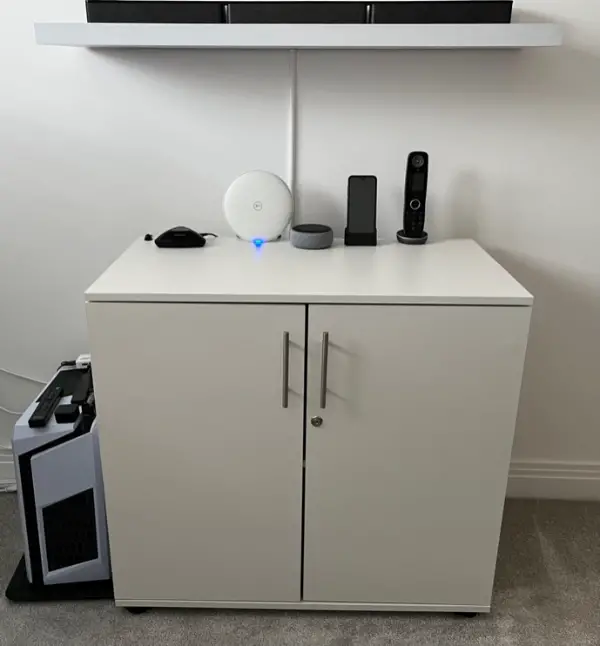
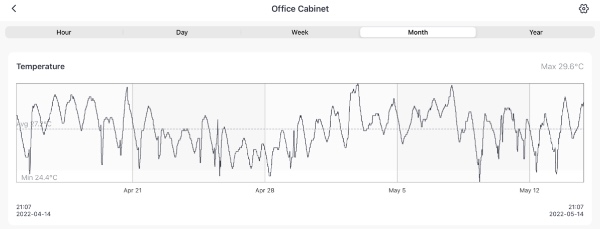
I store my Laptop, Xbox, Ethernet Switch, Set Top Box & Printer in a media cabinet in my office. Whilst my electronics (and cables) were neatly hidden away, I quickly realised my media cabinet was getting rather warm inside.

Media Cabinet Cooling Fans

This project’s focus is to install media cabinet cooling fans and automate turning the fans on/off, depending on the internal temperature.

Objectives

Stop Devices From Overheating

My first objective is to prevent my electronic devices from overheating. I need to improve air circulation around my devices and make sure they are not placed together, in one section of the media cabinet, that could trap heat.

If electronic devices overheat, they can cause permanent damage and stop working entirely. Overheating can occur when devices in a media cabinet are in direct sunlight, used for long periods, or if the ambient temperature is constantly high.

Automate Media Cabinet Cooling Fans

My second objective is to automate my media cabinet cooling fans. I want the fans to switch on when I turn on my devices or if the temperature inside the cabinet rises above a certain level.

Media Cabinet Cooling Fans

I also want the fans to switch off when I turn off my devices or after a set time from being activated by the temperature level inside.

Solution

I thoroughly researched media cabinet cooling fans and discovered most people either remove the door or drill & cut holes in their cabinet to fit fans.

Cooling Fans

I nearly chose AC Infinity Airplates but I purchased the SCCCF USB Dual Control Fans instead as they represent better value for money.

I can power the SCCCF fans with a USB port, hub or adapter. The fans have a three-speed controller so I can set the fan speed to the best noise and airflow level to suit my environment.

Media Cabinet Cooling Fans

You can also connect both fans with a metal buckle to provide greater air volume. The size of each fan is 9.64″ X 4.92″ X 1.81″, which makes it a perfect cooling solution for my media cabinet.

Cooling Pad

As my laptop is located on the bottom shelf, I purchased a TECKNET Laptop Cooling Pad to aid rising cool air.

The TECKNET laptop cooling pad is USB powered and has 3 powerful fans that can help stop my laptop from overheating. The fans work at 1200 RPM to pull in cool air from the bottom. There is 1 extra USB port for powering other devices.

Media Cabinet Cooling Fans

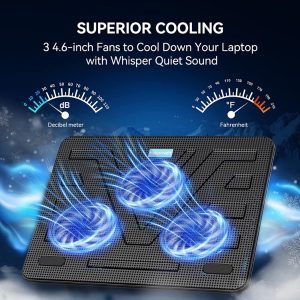
The cooling pad is ergonomically designed with 2 adjustable levels to lift and tilt your laptop if needed. Rubber grips at the bottom will prevent this cooling pad from sliding around too. 

SwitchBot Thermometer

To measure the temperature & humidity within my media cabinet, I purchased a SwitchBot Smart Thermometer. I am already familiar with SwitchBot products from their smart switch/button presser in another project.

I could have selected a Tuya/Smart Life compatible thermometer e.g. TLKZGO temperature monitor but as I had already invested in a SwitchBot hub, I opted for the lower cost SwitchBot option.

Media Cabinet Cooling Fans

The SwitchBot Meter is an indoor Bluetooth thermometer and hygrometer with a built-in Swiss-made sensor. The clear and high-resolution LED screen displays the large digits and battery volume, making it easy to read.

Smart Life/Tuya Smart Plug

To power the cooling fans & cooling pad at the same time, I connected both to a USB hub and powered the hub using a Smart Life compatible Smart Plug.

I can control this smart plug via my phone whenever and wherever I am, as long as I have a network connection. I like the Tuya/Smart Life app and already have several devices installed.

LED Garage Parking Assistant

This smart plug is Amazon Alexa or Google Assistant compatible and you can also schedule or set an auto-off timer, saving energy and money.

Installation

Fitting The Fans

To fit fans in 3 simple steps, first mark the centre point of where the fan(s) will go. Then use a drill to make a hole for the fan and its screws. Finally, attach the screws and fit the fan into place.

Step 1. Determine Fan Locations

The placement of a fan will vary depending on your media cabinet design. Remember heat rises, so at least one fan should be located near the top of the cabinet where hot air can escape.

You might also want to consider adding more than one fan for larger cabinets or if you have a lot of devices that generate heat. I decided on installing 2 in the top right, 1 on the middle shelf (facing upwards) and 1 in the lower left of my media cabinet.

Media Cabinet Cooling Fans

To place a fan, mark the approx. centre point, hold the fan in position and create an outline with a pencil or masking tape.

Step 2. Drill Holes

To cut a hole for a fan in a cabinet, you can either drill 2 diagonal holes within your outline and saw on the lines between them or invest in a 120mm Hole Saw for your drill. I chose the latter to make quicker & neater holes.

If you choose to saw the hole for your fan, make sure to use a fine-toothed hand saw or power jigsaw and go slowly to avoid mistakes. Afterwards, I’d recommend cleaning and vacuuming the sawdust out of your cabinet.

Step 3. Assemble & Install The Fan

To assemble your fan, attach the grille and mounting plates. Next, place your fan next to the cutout (check the fan is facing the right direction). Drill four holes in the corners of the mounting plate and insert screws to attach the fan to the cabinet.

Depending on the thickness of your media cabinet, you may need longer mounting screws.

Powering The Fans

The final step of this project’s installation was to connect the USB power leads to the USB hub and power via the smart plug.

Media Cabinet Cooling Fans

Automation

SwitchBot App

The SwitchBot app does a great job of reliably displaying the temperature & humidity within my media cabinet. It refreshes every 4 seconds and maintains ±0.4°C/±0.7°F accuracy in temperature and ±4% accuracy in humidity.

You can view your temperature & humidity data by hour, day, week, month or year.

Media Cabinet Cooling Fans

Smart Life/Tuya Scenes

In preparation for connecting the SwitchBot thermometer with IFTTT, I created a scene in the Smart Life app. I selected a “Tap-to-Run” scene which will switch the fan smart plug on for 2 hours and then switch off.

Media Cabinet Cooling Fans

IFTTT Applet

I produced an IFTTT applet for IF the SwitchBot thermometer temperature changes THEN activate a Smart Life scene.

Media Cabinet Cooling Fans

I set the Switchbot thermometer temperature condition to be higher than 30°C and to ignore the humidity condition.

Media Cabinet Cooling Fans

I set the Smart Life scene to run the “Tap-to-run” scene created earlier.

Media Cabinet Cooling Fans

Alexa Routines

I am not solely relying on IFTTT in this project. To prevent my devices from running hot and waiting for the cooling fans to kick in at 30°C, I have added the fans smart plug to power on/off within my Alexa routines.

For example, I start each day with an “Alexa, Start Work” routine.

Media Cabinet Cooling Fans

And I end each day with an “Alexa, Finish Work” routine.

Media Cabinet Cooling Fans

As you can see, both of these routines include the cooling fans & cooling pad powering on & off accordingly.

Wrap Up

You should now be able to install & automate your media cabinet cooling fans following my simple steps. Leave a comment below and let me know how it went or if you have any questions. Be sure to check out my other projects for more smart home tips & tricks.

Media Cabinet Cooling Fans


Leave a Reply